Thursday, September 30, 2010

Strings are on

Having strings on the guitar will help me to make the pickguard. I was also kinda eager to check out how well the frets played. (They are nice).


So, tonight I learned that the posts that came with the new bridge have a different thread than the inserts that were in the guitar. The new bridge also did not fit into the old posts. I could've either pulled out the old post inserts (by force, with a crow bar) or make the new bridge fit into the old posts. I opted for the latter. I grinded the bottom of the bridge on my belt sander until it fit. Don't worry, I only needed to take off about 1/2 mm.
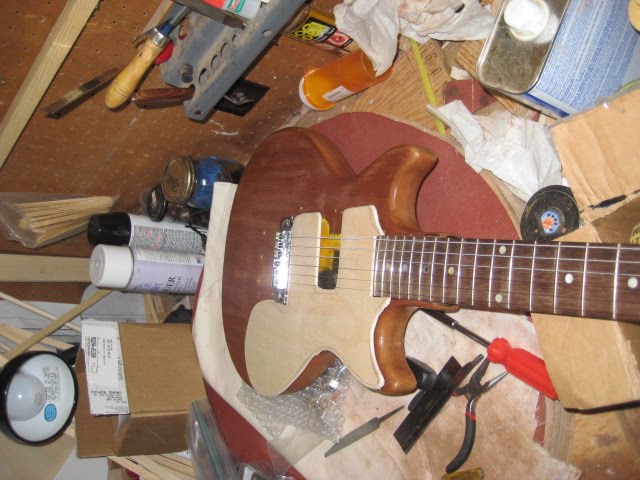
Here it is.


The nut needs more work but it is mostly there.


The back of the peghead had a whole bunch of different holes on it for different kinds of tuners, used over the years. One set worked. I need to fill them in though, because they were sorta crooked. But it works for now.


I'm planning to make the peghead face glossy black.


The pickguard doesn't fit now that the bridge is on, but that's the idea, to make it work with the other pieces in place. I also learned tonight that the pickguard doesn't fit under the bridge when the bridge is lowered enough to make the action playable. I'll have to adjust for that, too.


Hardware is here

Received from guitarfetish.com today.


Tuesday, September 21, 2010

Frets are in

I just put a little titebond glue on the frets to help lubricate them a little as they go in the slots. I use a hard rubber hammer and beat them in.


Pickguard final shape


Sunday, September 19, 2010

A start on the pickguard

Here's the template I made from thick poster stock.


Shape traced onto thin birch plywood.


I cut it out using a scroll saw.


I put a bevel on the pickguard using my drill press.


I'll continue working on it, slowly until the shape is just right...

Thursday, September 16, 2010

Pickguard idea

This template was cut out from a piece of posterboard. I'll trim it some more to make it more sleek. But this is the general idea.


The neck pickup arrived in the mail today

Here it is, a Lawrence Keystone telecaster neck pickup.


Wednesday, September 15, 2010

Parts arrived in the mail today

Stuff from Musicians Friend.


SD JB humbucker.


Fender gig bag.


The gig bag is made of sturdy material and has a cute little 'pick zipper' on it.


Stuff from Stew Mac.

Fret wire.


Radiused sanding block.

Wednesday, September 8, 2010

Fret removal

The plan is to rehab this old Melody Maker. There's not a whole lot to it at the moment.


I'll start out by pulling the frets and leveling the fingerboard.

Here's the old nut.


One whack with a hammer and chisel and it came out pretty easily.


Here's the new nut I made. I didn't want to use a bleached bone because it would be too sterile looking. This is unbleached.


This is my fret removal setup.


I like to apply heat to the fret for about 10 seconds. They come out pretty easy after that. If chipout occurs I have the super glue ready. I love that little painter's tool, the teeny spatula for spreading glue around.

The frets came out pretty easily.


Chip-out ocurred in only a few places.


This little thing is handy.


Sanding the fretboard reveals how much wear there was--more than there even appeared to be. And yep, it's Brazilian.


Oiling it up really makes it look nice again.


Ooh...Aah...